写过几个油猴脚本,经常对页面请求返回的数据进行拦截或者覆盖,这篇文章就做个总结,涉及到 fetch 和 xhr 两种类型的请求。
环境搭建
先简单写个 html 页面,搭一个 koa 服务进行测试。
html 页面提供一个 id=json 的 dom 用来加数据,后边我们补充 test.js 文件来请求接口。
1 |
|
将 html 通过 VSCode 的 live-server 插件运行在 http://127.0.0.1:5500/ 上。

安装 koa 和 koa-route 的 node 包,提供一个接口。
1 | const koa = require("koa"); |
提供了 /api/query 接口,返回 data: [1,2,3], 。运行在本地的 3002 端口上,并且设置跨域,允许从 http://127.0.0.1:5500 访问。
油猴脚本
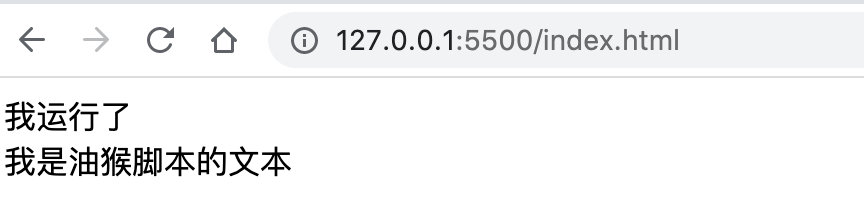
先简单写一个插入 我是油猴脚本的文本 的脚本,后边再进行修改。
1 | // ==UserScript== |
此时页面已经被成功拦截:
这里提一句,油猴脚本如果使用 @grant 申请了权限,此时脚本会运行在一个沙箱环境中,如果想访问原始的 window 对象,可以通过 window.unsafeWindow 。
并且我们加了 @run-at ,让脚本尽快执行。
fetch 请求
在 html 请求的 test.js 中添加 fetch 的代码。
1 | fetch("http://localhost:3002/api/query") |
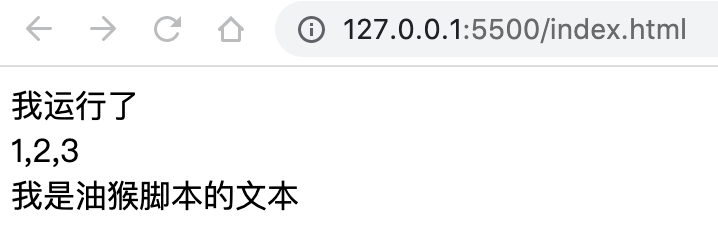
看下页面,此时就会把 data 显示出来。
如果想更改返回的数据,我们只需要在油猴脚本中重写 fetch 方法,将原数据拿到以后再返回即可。
1 | // ==UserScript== |
对 response 的处理有点绕,当时也是试了好多次才试出了这种方案。
做的事情就是把原来返回的 respones 复制,通过 json 方法拿到数据,进行修改数据,最后新生成一个 Response 进行返回。
看下效果:
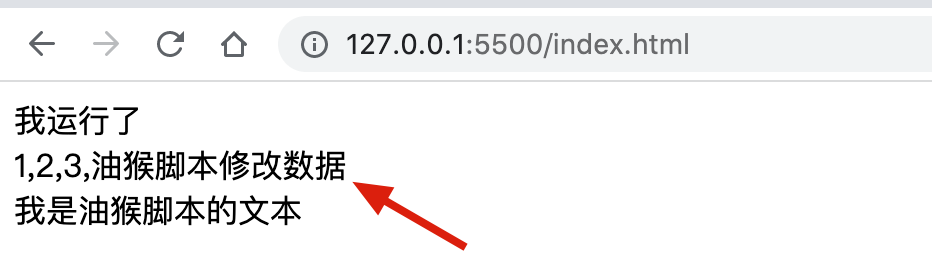
成功修改了返回的数据。
xhr
我们将 fetch 改为用 xhr 发送请求,因为页面简单所以请求可能在油猴脚本重写之前就发送了,正常网站不会这么快,所以这里加一个 setTimeout 进行延时。
1 | setTimeout(() => { |
和 fetch 的思路一样,我们可以在返回前更改 responseText 。
重写 XMLHttpRequest 原型对象的 open 或者 send 方法,在函数内拿到用户当前的 xhr 实例,监听 readystatechange 事件,然后重写 responseText 。
1 | const originOpen = XMLHttpRequest.prototype.open; |
运行一下:

拦截失败了,网上搜寻下答案,原因是 responseText 不是可写的,我们将原型对象上的 responseText 属性描述符打印一下。
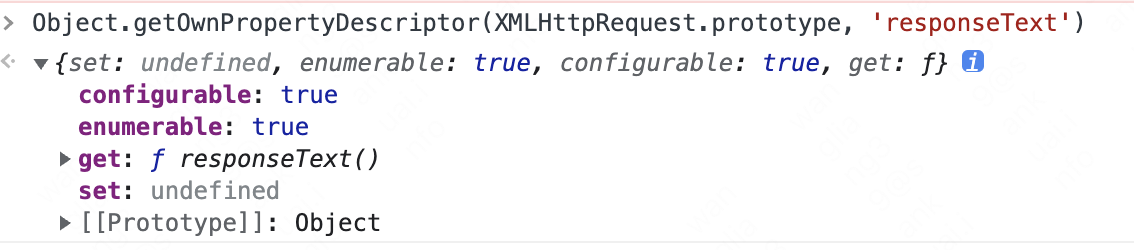
可以看到 set 属性是 undefined ,因此我们重写 responseText 失败了。
我们无法修改原型对象上的 responseText ,我们可以在当前 xhr 对象,也就是 this 上边定义一个同名的 responseText 属性,赋值的话有两种思路。
1、直接赋值
我们定义一个 writable: true, 的属性,然后直接赋值为我们修改后的数据。
1 | const originOpen = XMLHttpRequest.prototype.open; |
看下页面会发现成功拦截了:

2、重写 get
1 | const originOpen = XMLHttpRequest.prototype.open; |
我们拿到原型对象的 get ,然后在当前对象上定义 responseText 的 get属性,修改数据后返回即可。
相比于第一种方案,这种方案无需等待 readystatechange ,在开始的时候重写即可。
需要注意的是,上边方案都只是重写了 responseText 字段,不排除有的网站读取的是 response 字段,但修改的话和上边是一样的,这里就不写了。
总
通过对 fetch 和 xhr 的重写,我们基本上可以对网页「为所欲为」了,发挥想象力通过油猴脚本应该可以做很多有意思的事情。