Element使用的async-validator表单校验库源码解析

平常开发写 element 表单的时候,肯定少不了表单的校验,element 使用的是 async-validator 这个开源库。

image-20220517090312952

这篇文章详细分析一下 async-validator 的主流程。

使用方法

1
2
3
4
5
6
7
8
9
10
11
12
13
14
15
16
17
18
19
20
21
22
23
24
25
26
27
28
29
30
31
import Schema from 'async-validator';
const descriptor = {
list: {
required: true,
type: 'number',
},
limit: [
{
required: true,
message: '数量必填',
},
{
validator(r, v, cb) {
if (v < 100) {
return cb(new Error('数量不能小于 100'));
}
cb();
},
},
],
};
const validator = new Schema(descriptor);
validator.validate(
{ list: '12', limit: null },
{ firstFields: true },
(errors, fields) => {
if (errors) {
console.log('错误列表', errors);
}
},
);

我们需要定义 descriptor ,也就是我们在 element 中定义的 rules ,然后创建一个 Schema 对象。

最后调用 validate 函数,传递三个参数:

第一个参数是要校验的对象

第二个参数是 options 对象, firstFieldstrue ,表示同一个字段如果有多个校验规则,一旦出现校验不通过的规则后边的规则就不执行了。

还可以设置 firsttrue,这个是针对整个校验对象的,如果某个字段校验不通过,那么后边所有的字段就不再校验了。

第三个参数是校验结束后的回调函数,erros 保存了所有校验失败的字段以及 message 信息。

因此,上边代码的输出如下:

image-20220519081546339

list 对应结果的 message 是默认为我们添加的,limit 对应结果的 message 是我们自己设置的,会覆盖默认的 message

因为我们设置了 firstFieldstrue ,所以只校验了 limit 的第一个规则,第二个规则就没有走到。

我们给 limit 设置一个值,让它走到第二个校验规则。

1
2
3
4
5
6
7
8
9
validator.validate(
{ list: '12', limit: 3 },
{ firstFields: true },
(errors, fields) => {
if (errors) {
console.log('错误列表', errors);
}
},
);

输出如下:

image-20220519081840212

此时 limit 对应结果就是一个 Error 对象了,Error 对象除了本身的 message 属性,默认还为我们添加了 fieldfiledValue 属性。

预处理 descriptor

校验前 async-validator 会将传入的 descriptor 规范化。

我们传进入的是下边的样子:

1
2
3
4
5
6
7
8
9
10
11
12
13
14
15
16
17
18
19
20
const descriptor = {
list: {
required: true,
type: 'number',
},
limit: [
{
required: true,
message: '数量必填',
},
{
validator(r, v, cb) {
if (v < 100) {
return cb(new Error('数量不能小于 100'));
}
cb();
},
},
],
};

预处理后会变成下边的样子:

1
2
3
4
5
6
7
8
9
10
11
12
13
14
15
16
17
18
19
20
21
22
23
24
25
26
27
28
29
30
31
32
33
34
35
36
37
38
39
40
41
42
43
44
45
46
47
48
49
50
51
52
53
54
55
56
57
58
59
60
61
62
63
64
65
66
67
68
69
70
71
72
73
74
75
76
77
78
79
80
{
list: [
{
rule: {
required: true,
type: 'number',
field: 'list',
fullField: 'list',
validator: (rule, value, callback, source, options) => {
const errors = [];
const validate =
rule.required ||
(!rule.required && source.hasOwnProperty(rule.field));
if (validate) {
if (value === '') {
value = undefined;
}
if (isEmptyValue(value) && !rule.required) {
return callback();
}
rules.required(rule, value, source, errors, options);
if (value !== undefined) {
rules.type(rule, value, source, errors, options);
rules.range(rule, value, source, errors, options);
}
}
callback(errors);
},
},
value: '12',
source: {
list: '12',
limit: 3,
},
field: 'list',
},
],
limit: [
{
rule: {
required: true,
message: '数量必填',
field: 'limit',
fullField: 'limit',
type: 'string',
validator: (rule, value, callback, source, options) => {
const errors = [];
const type = Array.isArray(value) ? 'array' : typeof value;
rules.required(rule, value, source, errors, options, type);
callback(errors);
},
},
value: 3,
source: {
list: '12',
limit: 3,
},
field: 'limit',
},
{
rule: {
field: 'limit',
fullField: 'limit',
type: 'string',
validator(r, v, cb) {
if (v < 100) {
return cb(new Error('数量不能小于 100'));
}
cb();
},
},
value: 3,
source: {
list: '12',
limit: 3,
},
field: 'limit',
},
],
};

主要做了三件事情:

  1. 把每个字段的校验规则统一成了一个数组对象
  2. 把原本的校验对象放到了 rule 属性中,并且添加了 valuesourcefield 属性
  3. 根据 requiredtype 补充了默认的 validator 校验函数

预处理 descriptor 对应的源码

让我们过一下这部分源码。

在构造函数中,把 descriptor 所有字段的 rule 转为了数组,保存到 rules 对象中。

1
2
3
4
5
6
7
8
9
10
11
12
13
14
15
16
17
18
constructor(descriptor: Rules) {
this.define(descriptor);
}

define(rules: Rules) {
if (!rules) {
throw new Error('Cannot configure a schema with no rules');
}
if (typeof rules !== 'object' || Array.isArray(rules)) {
throw new Error('Rules must be an object');
}
this.rules = {};

Object.keys(rules).forEach(name => {
const item: Rule = rules[name];
this.rules[name] = Array.isArray(item) ? item : [item];
});
}

剩下的处理都在 validate 函数中了,可以跟随下边的注释看一下:

1
2
3
4
5
6
7
8
9
10
11
12
13
14
15
16
17
18
19
20
21
22
23
24
25
26
27
28
29
30
31
32
33
34
35
36
37
38
39
40
41
42
43
44
45
46
47
48
49
50
51
52
53
 validate(source_: Values, o: any = {}, oc: any = () => {}): Promise<Values> {
let source: Values = source_;
let options: ValidateOption = o;
let callback: ValidateCallback = oc;
if (typeof options === 'function') {
callback = options;
options = {};
}
...

function complete(results: (ValidateError | ValidateError[])[]) {
...
}

const series: Record<string, RuleValuePackage[]> = {};
const keys = options.keys || Object.keys(this.rules); // 得到所有的要校验的 key
keys.forEach(z => { // 遍历所有字段
const arr = this.rules[z];
let value = source[z];
arr.forEach(r => { // 遍历每个字段的所有 rule
let rule: InternalRuleItem = r;
...
// 如果是函数,放到 validator 属性中
if (typeof rule === 'function') {
rule = {
validator: rule,
};
} else {
rule = { ...rule };
}

// 填充 validator 属性
rule.validator = this.getValidationMethod(rule);
if (!rule.validator) {
return;
}

// 填充其他属性
rule.field = z;
rule.fullField = rule.fullField || z;
rule.type = this.getType(rule);
series[z] = series[z] || [];
// 保存到 series 中
series[z].push({
rule,
value,
source,
field: z,
});
});
});
const errorFields = {};
}

看下上边的 getValidationMethod 方法:

1
2
3
4
5
6
7
8
9
10
11
12
13
14
15
16
17
getValidationMethod(rule: InternalRuleItem) {
// 如果用户自定了,直接返回自定义的
if (typeof rule.validator === 'function') {
return rule.validator;
}
const keys = Object.keys(rule);
const messageIndex = keys.indexOf('message');
if (messageIndex !== -1) {
keys.splice(messageIndex, 1);
}
// 如果只有一个 required 字段,返回 required 的校验函数
if (keys.length === 1 && keys[0] === 'required') {
return validators.required;
}
// 否则的根据 type 去返回校验函数
return validators[this.getType(rule)] || undefined;
}

所有的校验函数都是提前定义好的:

image-20220519094003441

前端的设计模式中-策略模式 中我们也提到过上边的逻辑。

循环校验

当我们有了预处理好的所有字段的校验规则。

1
2
3
4
5
6
7
8
9
10
11
12
13
14
15
16
17
18
19
20
21
22
23
24
25
26
27
28
29
30
31
32
33
34
35
36
37
38
39
40
41
42
43
44
45
46
47
48
49
50
51
52
53
54
55
56
57
58
59
60
61
62
63
64
65
66
67
68
69
70
71
72
73
74
75
76
77
78
79
80
const series = {
list: [
{
rule: {
required: true,
type: 'number',
field: 'list',
fullField: 'list',
validator: (rule, value, callback, source, options) => {
const errors = [];
const validate =
rule.required ||
(!rule.required && source.hasOwnProperty(rule.field));
if (validate) {
if (value === '') {
value = undefined;
}
if (isEmptyValue(value) && !rule.required) {
return callback();
}
rules.required(rule, value, source, errors, options);
if (value !== undefined) {
rules.type(rule, value, source, errors, options);
rules.range(rule, value, source, errors, options);
}
}
callback(errors);
},
},
value: '12',
source: {
list: '12',
limit: 3,
},
field: 'list',
},
],
limit: [
{
rule: {
required: true,
message: '数量必填',
field: 'limit',
fullField: 'limit',
type: 'string',
validator: (rule, value, callback, source, options) => {
const errors = [];
const type = Array.isArray(value) ? 'array' : typeof value;
rules.required(rule, value, source, errors, options, type);
callback(errors);
},
},
value: 3,
source: {
list: '12',
limit: 3,
},
field: 'limit',
},
{
rule: {
field: 'limit',
fullField: 'limit',
type: 'string',
validator(r, v, cb) {
if (v < 100) {
return cb(new Error('数量不能小于 100'));
}
cb();
},
},
value: 3,
source: {
list: '12',
limit: 3,
},
field: 'limit',
},
],
};

接下来只需要搞一个双重循环,执行所有的字段和每个字段的所有校验函数。

1
2
3
4
5
6
for(const field of Object.keys(series)) { // 遍历每一个字段
for(const data of series[field]) { // 每一个规则
const rule = data.rule;
const res = rule.validator(rule, data.value, cb, data.source, options);
}
}

ruledata.valuedata.source 就是当前规则相关的变量,options 是最开始调用校验的时候传进来的 { firstFields: true },,那么 cb 是什么?

cb 函数接受一个错误数据列表,如果返回的不是数组会包装为数组,然后对错误进行填充。

最后调用 doIt 函数,将校验结果传入,后边会介绍这个方法。

1
2
3
4
5
6
7
8
9
function cb(e = []) {
let errorList = Array.isArray(e) ? e : [e];
if (errorList.length && rule.message !== undefined) {
errorList = [].concat(rule.message); // 错误列表优先使用 message 字段
}
// Fill error info
let filledErrors = errorList.map(complementError(rule, source));
doIt(filledErrors); // 将当前字段的错误列表保存起来
}

complementError 会返回一个函数,将错误列表进行填充,主要就是补充了 fieldfieldValue 属性。

1
2
3
4
5
6
7
8
9
10
11
12
13
14
15
16
17
18
19
20
export function complementError(rule: InternalRuleItem, source: Values) {
return (oe: ValidateError | (() => string) | string): ValidateError => {
let fieldValue;
if (rule.fullFields) {
fieldValue = getValue(source, rule.fullFields);
} else {
fieldValue = source[(oe as any).field || rule.fullField];
}
if (isErrorObj(oe)) {
oe.field = oe.field || rule.fullField;
oe.fieldValue = fieldValue;
return oe;
}
return {
message: typeof oe === 'function' ? oe() : oe,
fieldValue,
field: ((oe as unknown) as ValidateError).field || rule.fullField,
};
};
}

收到的错误列表分为两种情况:

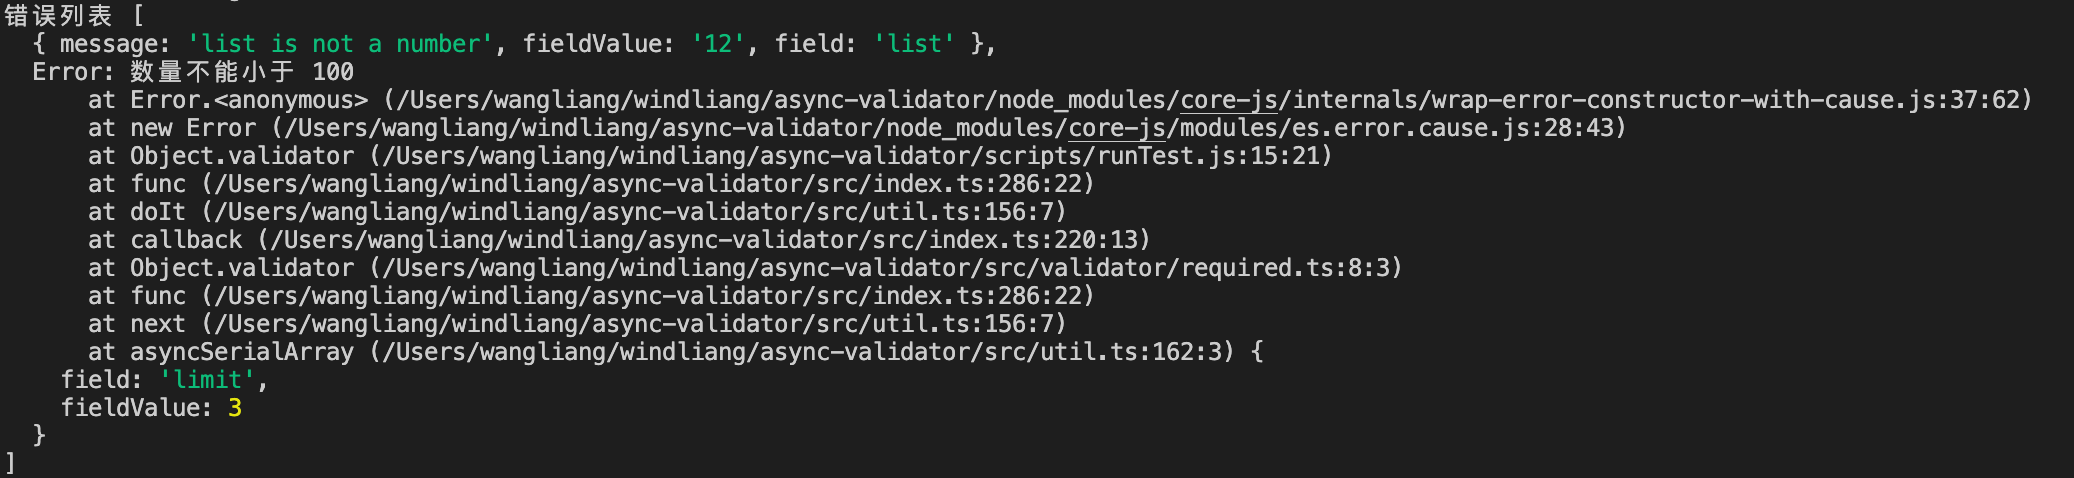
处理前如果 cb 收到的是 Error 列表,比如这样调用 cb(new Error('数量不能小于 100'));

那么处理前是下图:

image-20220521082112809

处理后,就会往 Error 对象中塞入 fieldfieldValue 属性。

image-20220521082219018

处理前如果cb 是字符串列表,比如这样调用 cb(['list is required', 'list is not a number'])

image-20220521082345013

同样的,处理后也是塞入 fieldfieldValue 属性。

image-20220521082457313

再回到我们的双重循环中。

1
2
3
4
5
6
for(const field of Object.keys(series)) { // 遍历每一个字段
for(const data of series[field]) { // 每一个规则
const rule = data.rule;
const res = rule.validator(rule, data.value, cb, data.source, options);
}
}

其中 validator 函数就是我们自己定义的:

1
2
3
4
5
6
validator(r, v, cb) {
if (v < 100) {
return cb(new Error('数量不能小于 100'));
}
cb();
},

由于 Element 官方示例是上边的样子,所以我们一般都按照上边的样子写,但其实我们也可以不调用 cb 函数,而是仅仅 return 字符串数组,或者 boolean 值,调用 cb 函数交给双重循环。

1
2
3
4
5
6
validator(r, v, cb) {
if (v < 100) {
return '数量不能小于 100'
}
return true;
},

双重循环中来处理 validator 的返回值去调用 cb 函数。

1
2
3
4
5
6
7
8
9
10
11
12
13
14
15
16
17
18
19
20
for(const field of Object.keys(series)) { // 遍历每一个字段
for(const data of series[field]) { // 每一个规则
const rule = data.rule;
const res = rule.validator(rule, data.value, cb, data.source, options);
// 根据返回的结果,去调用 cb 函数
if (res === true) {
cb();
} else if (res === false) {
cb(
typeof rule.message === 'function'
? rule.message(rule.fullField || rule.field)
: rule.message || `${rule.fullField || rule.field} fails`,
);
} else if (res instanceof Array) {
cb(res);
} else if (res instanceof Error) {
cb(res.message);
}
}
}

asyncMap

向上边我们直接粗暴的写双重循环去依次校验也没有问题,但因为校验库还支持一些参数,比如前边介绍的:

image-20220521083746778

如果是 for 循环中去处理 firstFieldsfirst 的逻辑,就过于耦合了,未来再扩充其他逻辑,双重循环中的逻辑就会越来越复杂。

async-validator 的处理方式在这里就比较优雅了,实现了 asyncMap 方法,作用就是遍历 series 数组,并且处理了 firstFieldsfirst 参数的逻辑。

下边来分析一下实现:

看一下 asyncMap 的入口参数。

1
2
3
4
5
6
7
8
9
export function asyncMap(
objArr: Record<string, RuleValuePackage[]>,
option: ValidateOption,
func: ValidateFunc,
callback: (errors: ValidateError[]) => void,
source: Values,
){

}

接受 5 个参数:

objArr:要遍历的 rule 规则,就是我们前边生成的 series 数组,即双重循环遍历的对象。

option :最开始传入的 option,可能包含 firstFieldsfirst 属性。

func:遍历过程的中会调用这个函数,会传入当前遍历的 rule 和一个 doIt 函数,doIt 函数需要接收处理好的校验结果。这里就需要我们之前 for 循环内部的处理逻辑。

callback : 全部检验结束后调用,会传入所有的校验结果。

source:要校验的对象。

这样我们就可以把 for 循环改为直接调用 asyncMap 函数了。

1
2
3
4
5
6
7
8
9
10
11
asyncMap(
series,
options,
(data, doIt) => {
...
},
results => {
complete(results);
},
source,
);

第三个参数就是需要我们去处理 data 这个校验规则,也就是之前 for 循环中的逻辑移动过来。

其中 doIt 函数我们在之前讲的 cb 函数中调用即可。

1
2
3
4
5
6
7
8
9
10
11
12
13
14
15
16
17
18
19
20
21
22
23
24
25
26
27
28
29
(data, doIt) => {
const rule = data.rule;
rule.field = data.field;
function cb(e: SyncErrorType | SyncErrorType[] = []) {
let errorList = Array.isArray(e) ? e : [e];
if (errorList.length && rule.message !== undefined) {
errorList = [].concat(rule.message);
}
// Fill error info
let filledErrors = errorList.map(complementError(rule, source));
doIt(filledErrors); // 将当前字段的错误列表保存起来
}
/******** for 循环中的逻辑 *****************/
const res = rule.validator(rule, data.value, cb, data.source, options);
if (res === true) {
cb();
} else if (res === false) {
cb(
typeof rule.message === 'function'
? rule.message(rule.fullField || rule.field)
: rule.message || `${rule.fullField || rule.field} fails`,
);
} else if (res instanceof Array) {
cb(res);
} else if (res instanceof Error) {
cb(res.message);
}
/***************************************/
},

最后就是全部遍历结束后的 complete 函数,我们只需要把 results 列表传到外边即可。

1
2
3
4
5
6
7
8
9
function complete(results) {
let fields: ValidateFieldsError = {};
if (!results.length) {
callback(null, source);
} else {
fields = convertFieldsError(results);
callback (results, fields);
}
}

上边的 callback 函数就是我们调用校验函数时候外部传入的:

1
2
3
4
5
6
7
8
9
10
11
12
const validator = new Schema(descriptor);
validator.validate(
{ list: '12', limit: null },
{ firstFields: true },
//***** 上边的 callback ********************/
(errors, fields) => {
if (errors) {
console.log('错误列表', errors);
}
},
//*********************************************/
);

内层循环

双重循环的的外层是遍历所有字段,内层是遍历该字段的所有规则。

我们来先看一下内层循环的实现:

async-validator 库提供了 asyncParallelArray 方法。

1
2
3
4
5
6
7
8
9
10
11
12
13
14
15
16
17
18
19
20
21
function asyncParallelArray(
arr: RuleValuePackage[],
func: ValidateFunc,
callback: (errors: ValidateError[]) => void,
) {
const results: ValidateError[] = [];
let total = 0;
const arrLength = arr.length;

function count(errors: ValidateError[]) {
results.push(...(errors || []));
total++;
if (total === arrLength) {
callback(results);
}
}

arr.forEach(a => {
func(a, count);
});
}

接受三个参数:

arr 就是当前字段要遍历的规则列表。

func 是处理 rule 规则的函数,内部会调用这里的 count 方法,接受当前 a 的校验结果。

传入的 func 其实就是我们前边介绍过的 for 循环内部逻辑,a 是下边的 data 参数,count 就是下边的 doIt

1
2
3
4
5
6
7
8
9
10
11
12
13
14
15
16
17
18
19
20
21
22
23
24
25
26
27
28
(data, doIt) => {
const rule = data.rule;
rule.field = data.field;
function cb(e: SyncErrorType | SyncErrorType[] = []) {
let errorList = Array.isArray(e) ? e : [e];
if (errorList.length && rule.message !== undefined) {
errorList = [].concat(rule.message);
}
// Fill error info
let filledErrors = errorList.map(complementError(rule, source));
doIt(filledErrors);
}

const res = rule.validator(rule, data.value, cb, data.source, options);
if (res === true) {
cb();
} else if (res === false) {
cb(
typeof rule.message === 'function'
? rule.message(rule.fullField || rule.field)
: rule.message || `${rule.fullField || rule.field} fails`,
);
} else if (res instanceof Array) {
cb(res);
} else if (res instanceof Error) {
cb(res.message);
}
},

第三个参数 callback 是当前 arr 全部校验结束后的回调,代表当前字段的所有校验规则都判断结束。

这里需要注意的是,我们是通过 count 进入的次数来判断是否去调用 callback 函数,而不是 arr 遍历结束后调用 callback

除了 asyncParallelArray 方法,因为有 firstFields 属性的存在,也就是遍历某个字段的所有规则时,如果出现校验不通过的规则就直接结束,后边的规则不再进行判断。

因此, async-validator 还提供了 asyncSerialArray 方法。

1
2
3
4
5
6
7
8
9
10
11
12
13
14
15
16
17
18
19
20
21
22
23
24
function asyncSerialArray(
arr: RuleValuePackage[],
func: ValidateFunc,
callback: (errors: ValidateError[]) => void,
) {
let index = 0;
const arrLength = arr.length;

function next(errors: ValidateError[]) {
if (errors && errors.length) {
callback(errors);
return;
}
const original = index;
index = index + 1;
if (original < arrLength) {
func(arr[original], next);
} else {
callback([]);
}
}

next([]);
}

入口参数和 asyncParallelArray 是一致的,区别在于对于 arr 是顺序执行,如果过程中出现了校验不通过的规则,就直接调用 callback 结束。

外层循环

外层循环和上边很类似,其实就是遍历所有字段,然后把每个字段的校验列表传给内层循环即可。

1
2
3
4
5
6
7
8
9
10
11
12
13
14
15
16
17
18
19
20
21
22
23
24
25
26
27
28
29
30
31
32
33
34
35
export function asyncMap(
objArr: Record<string, RuleValuePackage[]>,
option: ValidateOption,
func: ValidateFunc,
callback: (errors: ValidateError[]) => void,
source: Values,
) {
const firstFields =
option.firstFields === true
? Object.keys(objArr)
: option.firstFields || [];

const objArrKeys = Object.keys(objArr);
const objArrLength = objArrKeys.length;
let total = 0;
const results: ValidateError[] = [];
const next = (errors: ValidateError[]) => {
results.push.apply(results, errors);
total++;
if (total === objArrLength) {
callback(results);
}
};
if (!objArrKeys.length) {
callback(results);
}
objArrKeys.forEach(key => {
const arr = objArr[key];
if (firstFields.indexOf(key) !== -1) {
asyncSerialArray(arr, func, next);
} else {
asyncParallelArray(arr, func, next);
}
});
}

入口参数前边已经介绍过了,可以看到我们做的就是遍历 objArrKeys 数组,然后根据 firstFields 的值去调用 asyncSerialArrayasyncParallelArray 。内存循环判断结束后会调用上边的 next 方法。

next 同样也是通过进入的次数,来判断是否调用 callback 函数,也就是前边介绍的 complete 方法。

和内层循环类似,因为有 first 属性的存在,也就是遍历某个字段时,存在校验不通过的字段就直接结束,后边的字段就不再进行判断。

我们只需要把所有规则打平,然后调用 asyncSerialArray 方法即可。

1
2
3
4
5
6
7
8
9
10
11
12
13
14
15
if (option.first) {
const next = (errors: ValidateError[]) => {
callback(errors);
};
const flattenArr = flattenObjArr(objArr);
asyncSerialArray(flattenArr, func, next);
}

function flattenObjArr(objArr: Record<string, RuleValuePackage[]>) {
const ret: RuleValuePackage[] = [];
Object.keys(objArr).forEach(k => {
ret.push(...(objArr[k] || []));
});
return ret;
}

代码总

以上就是 async-validator 源码的主要流程了,说起来也简单,先预处理所有规则,然后通过 asyncMap 方法双层循环遍历所有校验规则即可,这个双层循环的抽离确实很优雅,避免了循环中耦合太多逻辑。

除了上边介绍的代码,因为 async-validator 还支持 Promise 的调用风格,校验函数支持 Promise 函数等其他功能,大家感兴趣也可以到 async-validator 看一下更详细的源码。

值得一提的点是,双层循环是通过计数来判断是否结束的,而进入计数其实就是调用 cb 函数。因此如果我们规则是下边的样子:

1
2
3
4
5
6
7
8
9
10
11
12
13
14
15
16
17
18
19
20
21
22
23
24
25
26
27
28
29
30
import Schema from '../src/index';
const descriptor = {
limit: [
{
validator(r, v, cb) {
if (v < 100) {
cb('校验1');
}
cb();
},
},
{
validator(r, v, cb) {
if (v < 50) {
return cb('校验2');
}
cb();
},
},
],
};
const validator = new Schema(descriptor);
validator.validate(
{ limit: 3 },
(errors, fields) => {
if (errors) {
console.log('错误列表', errors);
}
},
);

因为我们没有传递 firstFields 属性,所以我们期望的是将 limit 所有的校验都进行了,limit 的值是 3 ,所以两个校验都没通过,应该输出下边的内容:

image-20220521103342907

但其实只进行了第一个的校验:

image-20220521103508233

原因就在于第一个 validator 进行了两次 cb ,然后内层循环的 callback 就提前调用了。

1
2
3
4
5
6
validator(r, v, cb) {
if (v < 100) {
cb('校验1');
}
cb();
},

因此我们最好保证一个 validator 只进行一次 cb ,走到 cb 后就直接 return。(因为 Element 会设置 firstFieldstrue,所以其实有多个 cb 也不影响最终结果)

1
2
3
4
5
6
validator(r, v, cb) {
if (v < 100) {
return cb('校验1');
}
cb();
},

并且一定要有一个 cb ,不然最终的回调函数永远也不会执行了,这就是为什么 Element 提示我们要进行 cb

image-20220521103841307

但这里说的也不够严谨,我们也可以返回字符串,或者字符串数组、布尔值等, async-validator 内部会根据 validator 返回的结果去调用 cb 函数。

1
2
3
4
5
6
7
8
9
10
11
12
13
14
const res = rule.validator(rule, data.value, cb, data.source, options);
if (res === true) {
cb();
} else if (res === false) {
cb(
typeof rule.message === 'function'
? rule.message(rule.fullField || rule.field)
: rule.message || `${rule.fullField || rule.field} fails`,
);
} else if (res instanceof Array) {
cb(res);
} else if (res instanceof Error) {
cb(res.message);
}

async-validator 用计数的方式来判断是否去调用回调,就是为了实现异步的校验,当异步过程结束后才去调用 cb ,代表校验完成。

其他属性

平时写代码直接参照前人的校验规则去仿照着写了,大家也基本上是按照 Element 的样例来写校验规则,如果去 async-validator 看一下的话,会发现一些其他没听过的属性,这里也记录下。

validator 校验函数最多能接收到 5 个参数。

1
2
3
4
5
6
validator(rule, value, callback, source, options) {
const errors = [];
// test if email address already exists in a database
// and add a validation error to the errors array if it does
return errors;
},

我们可以通过第四个参数 source 拿到整个表单的对象,如果想校验一些联动的逻辑,我们就可以通过 source 拿到其他字段的值。

对对象字段的校验,如果校验字段是个对象,我们可以通过 fields 来校验对象中的字段。

1
2
3
4
5
6
7
8
9
10
11
12
13
14
15
16
const descriptor = {
address: {
type: 'object',
required: true,
fields: {
street: { type: 'string', required: true },
city: { type: 'string', required: true },
zip: { type: 'string', required: true, len: 8, message: 'invalid zip' },
},
},
name: { type: 'string', required: true },
};
const validator = new Schema(descriptor);
validator.validate({ address: {} }, (errors, fields) => {
// errors for address.street, address.city, address.zip
});

transform 函数,可以将值先进行一次转换,然后再进行校验。

1
2
3
4
5
6
7
8
9
10
const descriptor = {
name: {
type: 'string',
required: true,
pattern: /^[a-z]+$/,
transform(value) {
return value.trim();
},
},
};

asyncValidator,校验函数内部是用 Promise 或者直接返回一个 Promise

1
2
3
4
5
6
7
8
9
10
11
12
13
14
15
16
17
18
19
20
21
22
23
const fields = {
asyncField: {
asyncValidator(rule, value, callback) {
ajax({
url: 'xx',
value: value,
}).then(function(data) {
callback();
}, function(error) {
callback(new Error(error));
});
},
},

promiseField: {
asyncValidator(rule, value) {
return ajax({
url: 'xx',
value: value,
});
},
},
};

上边就是 async-validator 开源库的核心源码了,希望对你有帮助。

windliang wechat